User guide
Introduction
AgileGeneFilter allows sequence variants exported from AgileVariantViewer or
AgileAnnotator to be filtered, by first identifying the proteins that are affected by the sequence variants and
then performing a textual data search on these proteins, using information downloaded from the UNI-Prot web page. The text search is composed of two parts:
Entering sequence variant data
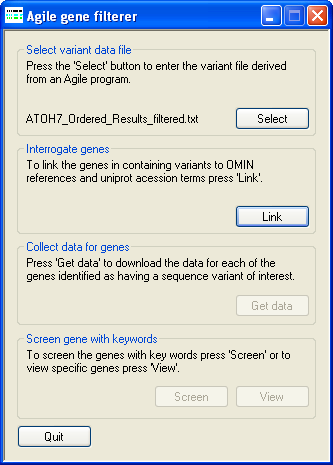
Figure 1: Entering a sequence variant file.
AgileGeneFilter is designed to analysis sequence variant data that has been exported by
AgileVariantViewer, AgileKnownSNPFilter or
AgileAnnotator. AgileGeneFilter does not discount sequence variants previously identified
by the 1000 genome Project, consequently there is no advantage in using data filtered by AgileKnownSNPFilter over data
exported by AgileAnnotator. However, by first analysing the data with
AgileVariantViewer it is possible to significantly reduce the number of sequence variants in an analysis. Therefore it is advantageous to use data exported from
AgileVariantViewer compared to AgileAnnotator.
A description of the file formats of the variant and read depth files can be found here, while AgileFileViewer a program designed to view the
data, can be found here.
To enter a data file, press the Select button on the Select variant data file panel and select the appropriate file. A demonstration
sequence variant file can be downloaded from here (~0.16 Mb).
Linking sequence variants to proteins
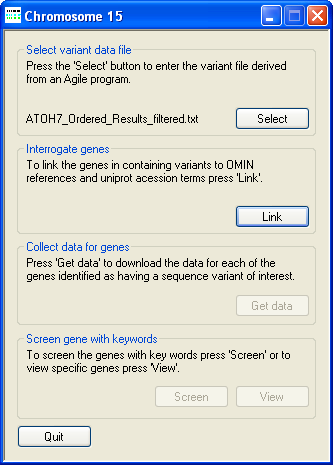
Figure 2: Linking sequence variants to a UNI-Prot protein ID.
To link the sequence variants to the proteins annotated by UNI-Prot, press the Link button on the Interrogate genes panel and select
the Access database file (download here [~4.9 Mb]) that contains the required gene to UNI-Prot protein ID information. As
AgileGeneFilter links the sequence variants to the appropriate UNI-Prot protein ID the programs progress is shown in the Title bar
(Figure 2).
Downloading and extracting UNI-Prot protein information
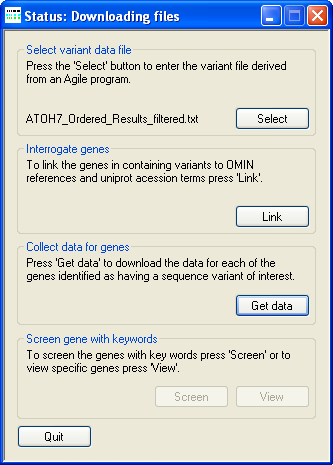
Figure 3: Downloading information from the UNI-Prot website.
To acquire and extract UNI-Prot protein information press the Get data button on the Collect data for genes panel and select a folder
in which to store the downloaded files. Once selected AgileGeneFilter will look in this folder for files that it has previously downloaded, if a UNI-Prot data for
a file protein is absent, AgileGeneFilter will attempt to download the information from the UNI-Prot website. If the number of web pages to be downloaded is large
or the internet connection speed is slow, this step may take a long time. During the downloading of data AgileGeneFilter's Title bar
will display the phrase "Status: Downloading files" (Figure 3)
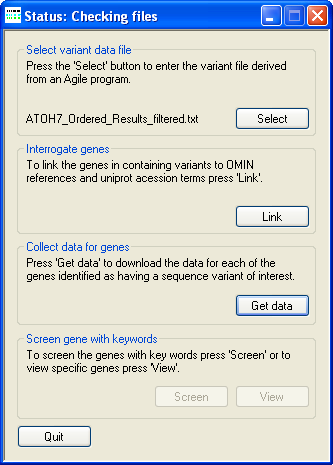
Figure 4: Checking the downloaded files
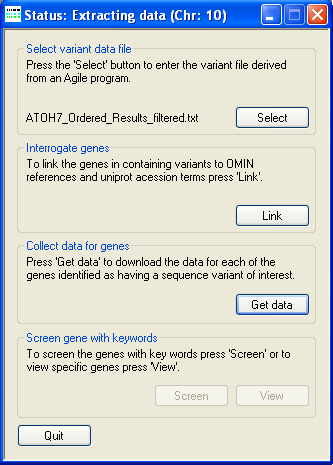
Figure 5: Extracting data from the files
Once the files have been downloaded, AgileGeneFilter checks which files have been successfully downloaded and attempts to redownload any files that appear
to be corrupted or absent. During this time AgileGeneFilter's Title bar will display the phrase "Status: Checking files"
(Figure 4). Next AgileGeneFilter will extract the protein annotation data from the files. If the data originates from a freshly downloaded HTML file
AgileGeneFilter will extract the data from the file and create a smaller text file that may be used in future analysis. During this time
AgileGeneFilter's Title bar will display the phrase "Status: Extracting data (Chr: n)" where 'n' identifies the chromosome on which
the current protein is located (Figure 5). A compressed folder containing data for over 20,000 proteins can be downloaded from here (~53 Mb). Since the annotation of
these proteins is constantly changing, it may be necessary to periodical delete these files and download the current versions.
Viewing and filtering the UNI-Prot data linked to each protein
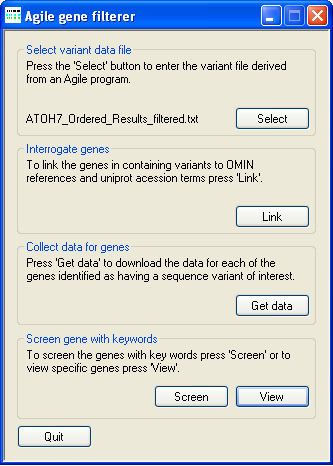
Figure 6: Screening the protein dataset.
Once the UNI-Prot protein annotation data has been extracted it is possible to either manually search the data or create an automated filtering scheme which can then be used to filter the
proteins. To manually search the proteins press the View button on the Screen gene with keywords panel. This will open the
Details window described below (Figure 7). However, if the protein dataset contains a large number of proteins it may be better to press the
Screen button on the Screen gene with keywords panel and automate the filter process. When the Screen button
is pressed the Protein function based variant filtering window (described below) is opened (Figure 8).
Manually screening protein data
If the number of proteins in the dataset is small or only a few specific genes need to be screened, it may be simpler to screen the proteins by eye rather than creating an automated screening scheme.
To manually screen the data press the View button on the Screen gene with keywords panel (Figure 6) to open the
Details window (Figure 7).
The Protein set details panel contains an alphabetically ordered list of the proteins in the dataset, selecting a protein in this list causes the window to display the
annotated data for that protein. If a protein name (or part of a protein's name) is entered in to the text box, next to the Search for label on the
Protein set details panel, the first occurrence of the text in the protein name list is highlighted, allowing a specific protein to be selected from large datasets.
The Details of a protein in the current set of proteins panel displays the data for the currently selected protein. In the top left corner of the panel, the protein's
UNI-Prot ID, name, gene name and protein family name/description is shown. Pressing either the UNI-Prot or OMIM button opens a web browser
displaying the current UNI-Prot or OMIM web page for the selected protein, while pressing the References button opens the
References window, which displays the references UNI-Prot as linked to the protein (Figure 14). The Protein and Gene
tabs below the row of buttons displays the list of gene ontology terms that have been associated to the gene and protein's 'Biological process', 'Cellular component', 'Ligand' and 'Molecular function'.
The Descriptions panel to the right of the Details window displays the description created by UNI-Prot of the proteins 'Function', 'Structure'
and 'Location'. Each of these descriptions can be viewed by selecting one of the Function, Structure and Location
options, which then displays the selected description in the large text area in the Descriptions panel. To search for a specific text or phrase in the currently selected
description, enter the text or phrase in the smaller text box at the bottom of the Descriptions panel then press the Find button. If the search phrase
is present in the description the first instance of it will be highlighted. Repeatedly pressing the button results in each instance of the search phrase been highlighted in turn.
Create an automated filtering scheme
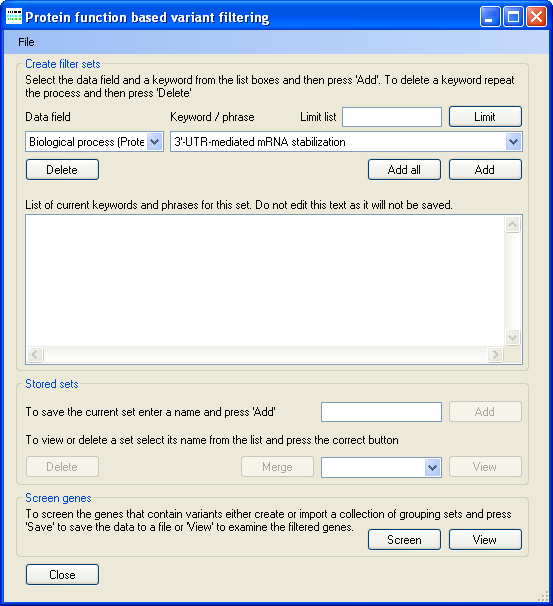
Figure 8: Screating filter sets used to filter the protein dataset.
Pressing the Screen button in the Screen gene with keywords panel (Figure 6) causes the Protein function based variant
filtering window to open (Figure 8). It is possible to create a number of different sets of gene ontology terms and search key word search terms, which can then be used to filter the proteins in the
protein dataset.
Selecting gene ontology terms to includes in a filter set
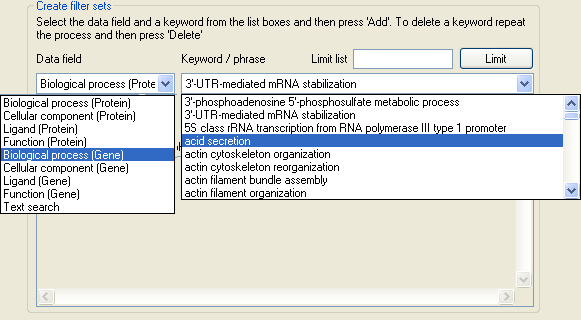
Figure 9: Selecting gene ontology terms.

Figure 10: Filtering the list of gene ontology terms.
The list below the Data field label in the Create filter sets panel contains the names of the different categories used by UNI-Prot to
group different gene ontology terms (Figure 9). By selecting one of the category titles, the list below the Key/phrase label in the Create filter sets
panel is populated with the Gene ontology terms in that category and linked to the proteins in the current dataset.
Since for large protein datasets, the list of gene ontology terms in a category may be very long, it is possible to filter the currently displayed set of terms by entering a keyword in the text box to
the right of the Limit list label and then pressing the Limit button. For example in Figure 10, the gene ontology terms in the list has been limited to
those that contain the word 'retina'. To add terms to a filter set select the appropriate gene ontology term category, then select a gene ontology term from the list of available terms and finally press the
Add button below the list of gene ontology terms. To add multiple gene ontology terms either repeat the process or press the Add all button to add all the currently
displayed terms.
Adding keyword filter terms to a filter set
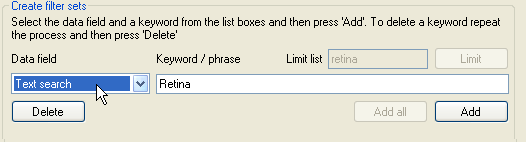
Figure 11: Entering keyword used to screen the protein dataset.
The list below the Data field label in the Create filter sets panel also contains the 'Text search' category, which rather than screening the
protein dataset against a set of gene ontology terms, allows proteins to be screened for the presence of key words or phrases in the description of the protein's function, structure and cellular localisation
as stated by UNI-Prot and against the protein's gene name, the protein family's description and the references as used by UNI-Prot. To add a keyword filter term, select 'Text search' from the category list
and enter the keyword in the text box to the right of the list and then press the Add button.
Deleting a filter terms from a filter set
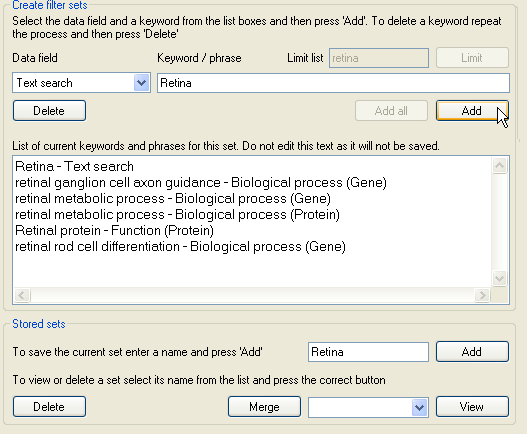
Figure 12: Deleting a filter terms
The list of filter terms is displayed in the large text area at the bottom of the Create filer sets panel. To remove a filter term, select the category and filter term
from in the two lists, as before, and then press the Delete button. Do not try to edit the text in the text area as the changes will not be saved.
Saving and deleting filter sets
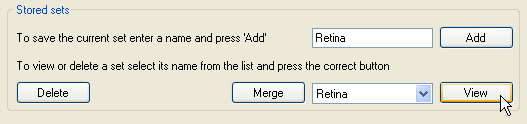
Figure 13: Saving and deleting filter sets
Once a set of filter terms has been selected it is necessary to save the filter set by entering a filter set name in the text area next to the Add on the
Stored sets panel and then pressing the Add button (Figure 13). To view a filter set, select its name from the list next to the
View button and press the View button. This will open a window that contains the search terms present in the filter set (Figure 14).
Similarly, to delete a filter set select its name from the same list and then press the Delete button. If you wish to merge the currently selected filter terms with a
stored filter set, select the stored filter set's name and press the Merge button.
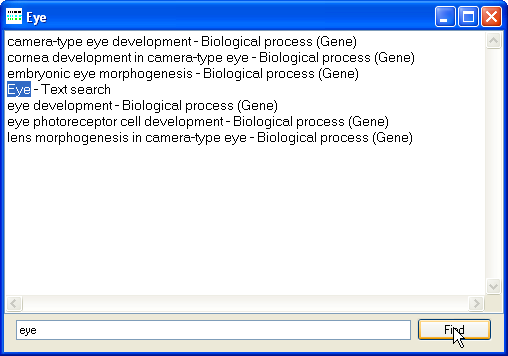
Figure 14: Viewing the filter terms in a stored filter set.
To search the filter set terms for a specific word or phrase, enter the text in the lower text area and press the Find button in the lower right corner of the window.
If the text is found it will be highlighted in the large text area, if the Find button is pressed repeatedly, each match will be highlighted in turn.
Opening and saving filter sets
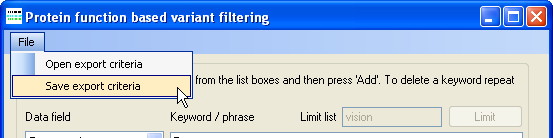
Figure 15: Opening and saving filter sets
It is possible to save a collection of filter sets and then re-enter them in to AgileGeneFilter by using the appropriate
and (Figure 15). The filter set files are saved with a *.mse file extension.
Screening the protein dataset
Once the filter sets have been created, it is possible to either view the proteins that match a filter term in at least one filter set by pressing the View
button on the Screen genes panel or to screen the proteins and export the results to a file by pressing the Screen button
on the Screen genes panel (Figure 8).
Viewing the filtered proteins
If the View button is pressed the Details is displayed. This window was described above (Figure 7) and its function differs only
in that it is only possible to view proteins/genes that that matched at least one of the filter terms present in at least one of the filter sets.
Exporting the screening results
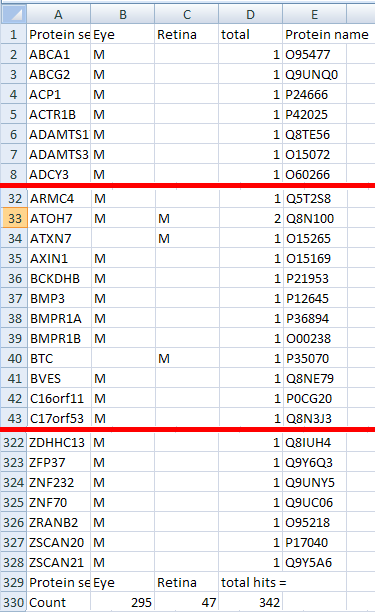
Figure 16: The filtered protein results are exported as a tab-
delimited text file that is best viewed in a spread sheet program.
If the Screen button is pressed, the information for each protein is screened in turn against each each filter set. If at least one filter term in a filter
set matches a protein it is considered a match for that filter set. When the comparison is completed the results are exported to a tab-delimited text file. In the file each line holds represents a
single protein and each column represents a single filter set. If a protein matches a filter set a 'M' is placed at the line/column intersection (Figure 16). The total number of hits a protein has
is shown in the second to last column, while the last row shows the number of matches a filter set has.
Figure 16 shows the top, middle and bottom of the results file created by filtering the 'ATOH7_Ordered_Results_filtered.txt' sequence variant file against the 'Screen filters.mse' filter set file
(download here). The initial sequence variant file contained information on homozygous variants from across the whole genome which mapped to 1831 different genes.
Of these 328 matched at least one filter set, while only 15 matched a filter term from both filter sets. If the analysis was repeated using sequence variants from the region of autozygosity found in
all affected patients in the original mapping experiment (see quick guide), only ATOH7 was found to match filter terms in both filter sets.